
In this blog, I discuss 9 finger rehabilitation exercises that you can use to rehab common finger injuries in rock climbing.
For the recovery of your injury to be effective you should figure out beforehand the nature of the injury, the severity of the injury, and what recovery phase you’re currently at.
Before I show the finger rehab exercises, I discuss the most common finger injuries and the healing stages of the different structures. Because this dictates what you can do and when.
1. Finger Anatomy
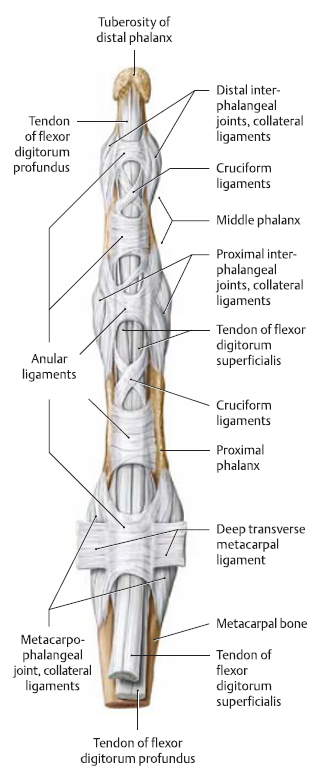
Each finger consists of 3 digits except for the thumb who has two. Each end of a digit has an articulate surface layered with cartilage to absorb force impact. The articulate surfaces of two digits are held together by a joint capsule that contains synovial fluid. This also absorbs impact forces and ensures smooth movement of the joint. The joint capsule itself is made up of multiple ligaments and other fibrous tissue. During an anatomy course, you’d learn each ligament and capsule separately, yet in reality, it’s more like one single web of connective tissue working together to protect, move, and contain your finger joint.
On all sides of the fingers, tendons insert into the digits. Tendons are the connection between muscles and bones and are therefore essential for movement. On the palmar side of your fingers, the flexor tendons are held close to your fingerbones with the help of the annular ligaments, or as you probably know them: “the pulley ligaments”. Besides that, on the palmar side of each finger joint, there are cruciate ligaments that have a similar function as the annular ligaments.
It depends on which structure you injure in your finger, and what the course of your rehabilitation will look like.
2. Common Finger Injuries
Finger injuries are the most common rock climbing injuries. Here are 6 that occur often:
- Pulley Injury (annular ligament strain/tear)
- Tenosynovitis
- Capsulitis
- Capsular Tear
- Epiphysial Fracture
- Lumbrical Injury
Most of these injuries require rest and then a loading program to successfully heal. Still, the type and amount of load vary.
You will apply the right type and amount of load by choosing the right exercises at the right moment in your recovery. Since each tissue regenerates at its own pace, you should implement exercise and dosage accordingly.
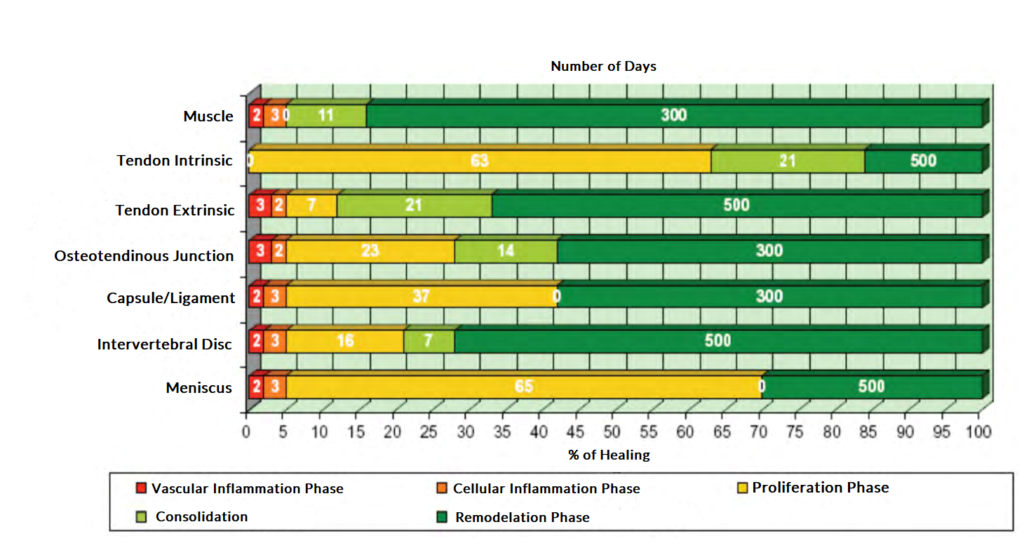
Here’s a quick overview of what happens during each tissue regeneration phase:
- Red & Orange (Inflammation phase): In the days right after the injury your body increases blood flow to the injury site and the delivery of cells which will help clear out the damaged tissue and cells which will start building new tissue.
- Yellow (Proliferation Phase): start building new (temporary tissue)
- Light Green (Consolidation Phase): the new tissue grows together
- Dark Green (Remodelling Phase): the temporary tissue will be remodeled into permanent tissue.
For rehabilitation, the phases indicate the following: the red timeframe means absolute rest. The orange part means passive movements and the yellow/light green indicates the necessity to start active movements guided by pain. This means that you’re allowed to feel pain while moving but it should go away right after. During the yellow, proliferation phase, you should start a structure-specific loading program to heal your injury best. During the remodelation phase, you should return to your pre-injury activity levels while challenging the recovered tissue with specific strengthening exercises. The better you load the tissue the stronger it’ll become.
3. 9 Finger Rehabilitation Exercises
Below I discuss 9 useful finger rehabilitation exercises. With each of the exercises, I explain how to do them and for which injuries they’re indicated.
2.1 Traction
When to do: with mobility problems/pain due to capsular restriction and after a capsular injury
Traction is a technique to stretch joint capsules. You can either do traction in the loose pack position (LPP) of a joint, or any other position. The LPP of a joint is the point where the joint capsule maintains an equal amount of tension all around. And traction of that joint will then result in equal stretch all over the joint capsule. If you do traction outside the LPP you’ll emphasize one part more than the other.
There are several ways to do traction but I’m going to keep my instruction here safe and simple: do either oscillating traction or continuous traction with a stretch 3/10. This is very light but sufficient to have a significant effect.
2.2 Passive Range of Motion
When to do: as long as you can’t move any joint actively. Usually during the inflammation and early proliferation phase of tissue regeneration.
For the passive range of motion movements, you use your opposite hand to move the injured finger. This is a great way to maintain mobility and prevent soft tissue contractures. Just move your finger joints within pain limits without activating the muscles of the finger you’re treating.
2.3 Active Range of Motion
When to do: as soon as you can move your finger again. Usually at the start of the proliferation phase.
The same as passive range of motion exercises only this time you actively move the joints. You can use your other hand to fixate part of your finger so you can move more specifically.
2.4 Stretching
When to do: at the start of the proliferation phase with muscle and tendon injuries.
Stretching of the finger muscles can be done in all directions and should be done with all muscle and tendon injuries. It depends on which regeneration phase your injury is at and how much pain you’re experiencing and how intense you stretch. Always start with a stretch intensity of 3/10 for 3×1 minutes. As your healing progresses you can increase the stretch intensity up to 8/10.
2.5 Eccentrics
When to do: more or less 2-3 weeks into your recovery after you’ve been stretching for 1-2 weeks.
Eccentric strengthening exercises are the next step in the recovery of muscle and tendon injury. You lengthen the muscle with resistance. You can use your other hand or an elastic band for resistance.
The eccentric phase of a contraction is the lengthening phase. So, as in the video help your finger to bend if you’re focusing on eccentrics for the finger flexors. If you do eccentrics for the muscles that extend the fingers you help with opening the fingers to evade concentric loading of your injured muscles and/or tendons. The reason for this is that concentric contractions are harder and therefore should be done after a minimum of 2 weeks of eccentric loading. If you follow this step-by-step process you force the injured tissue to heal optimally without overloading it.
2.6 Finger Extension in Elastic Band
When to do: after at least 2 weeks of eccentric finger extension exercises, which is 3-4 weeks after you injured your finger.
Finger extension in an elastic band is a form of concentric strengthening for the muscles that extend the finger. This is the final type of contraction in strengthening muscles and tendons after injuries.
You can change the intensity of the exercise by using an elastic band with more or less resistance. It’s important to extend your fingers entirely. If you can’t, the resistance is too high.
2.7 Kneading a Ball
When to do: after at least 2 weeks of eccentric finger flexion exercises, which is 3-4 weeks after you injured your finger.
Kneading a ball is another form of concentric movement but this time for the muscles that bend the fingers. You can change the amount of resistance by taking a harder or softer ball.
2.8 Finger Board
When to do: indicated for all finger injuries. Adjust load, intensity, volume, and frequency to your rehabilitation phase.
Between eccentric and concentric strengthening of muscles and tendons should actually be isometric loading. Maintaining a certain joint position without movement. This is what you can train on a fingerboard. Besides being an isometric contraction, the start of a hang on a fingerboard is an eccentric load. This is similar to what happens with rock climbing when you pull on a hold.
You can train your fingers in all sorts of ways on a fingerboard. It depends on the stage of your recovery and the strength of your fingers and how you use a fingerboard for finger rehabilitation.
If only 1 finger is injured you can only stress this finger by choosing the right kind of depth and leaving your feet on the floor to control the load.
2.9 Rock Climbing
When to do: when your fingers are strong enough to handle the intensity of sport climbing/bouldering.
Rock climbing in itself will and should be part of your finger rehabilitation program at some point. It’s best to progress from big to small holds and from light to harder grades. Increase your rock climbing/bouldering over various weeks so your fingers have enough time to adapt.