
This post is also available in:
![]() Deutsch (German)
Deutsch (German)
Rock climbing tenosynovitis is after the finger pulley injury the second most common finger injury in rock climbers. Its symptoms are similar and therefore the two injuries can be easily confused. Yet, with the right knowledge you’ll be able to differentiate the two and start on the right rehab track. However annoying your tenosynovitis might be right now, it’s something that heals well, and in most cases, you don’t need to stop climbing entirely.
How you should engage with a rock climbing tenosynovitis and ensure the best outcomes without sacrificing too much of your climbing you’ll discover in this article.
Let’s dive right in.
1. What is a Tenosynovitis?
A tenosynovitis is an inflammation of the tendon sheath. This is a fibrous connective tissue tube with a lining of synovium on the inside for lubrification. Your flexor tendon glides and slides through this tube and transfers the force from your forearm flexors to your finger digits. It makes the transit of force as smooth and efficient as possible.
Yet, when the flexor tendon is used often in the same position, for example in the (half) crimp position while rock climbing it can cause excessive friction between the tendon sheath and the distal part of the 2nd pulley ligament and the proximal part of the 4th pulley ligament. Both resist most pressure when you use the crimp grip. This friction then causes an inflammatory reaction on the palmar side of your finger. The resulting pain can come on slowly over several days or weeks or at once.
At its foundation a tenosynovitis is a degenerative condition which means that there isn’t necessarily acute tissue damage but rather inflammation and thickening of the synovium which causes the aforementioned friction on the tendon. It is possible to develop a tendinopathy or a tendinitis because of this process.
[image of friction of tendon sheath below A2 and A4 pulleys]
Besides pain, there are 4 other typical symptoms of inflammation:
- Redness
- Heat
- Swelling
- Loss of function
You’ll find that with tenosynovitis the swelling is usually on the palmar side of the finger over the A2 or A4 pulleys. Heat and redness you might or might not feel or see. And loss of function you’ll experience as a reduced ability to climb. In more severe cases you might also experience difficulty grabbing things in your daily life.
2. How Do You Get Tenosynovitis from Rock Climbing?
Crimping by itself isn’t enough to get a rock climbing tenosynovitis. There needs to be some sudden or chronic overload to cause the injury.
Here are a couple of common overload mechanisms leading to finger tenosynovitis:
- (Half) crimping holds you could also use an open grip on. This increases the number of times that there’s friction between the flexor tendon sheath and the A2 and A4 annular ligaments. The more often there’s friction the higher the chance of injury.
- Climbing a lot on pockets. Pockets place unique stress on the fingers. First, if you go from using 4 to 2 or 1 finger you double to quadruple the weight that needs to be carried by the remaining fingers. Secondly, hanging onto fewer fingers increases the amount of possible rotational and sheer forces on the interphalangeal joints. And finally, pockets often have sharp edges which leads to more pressure and friction on your pulley ligaments.
- Doing a lot of dynamic moves.
- Campus Training. Campus training is a form of power training without the feet. This means that you have to carry even more weight on your fingers. The explosive nature of this training puts great stress on the fingers and there is a small margin between the perfect training and injury.
- A foot slip can cause acute overload to the tendon sheath because of the high force involved.
- A sudden increase in training load in the previous weeks. Sudden increases in training load make you prone to injury because your tissues don’t have enough time to adapt to the new demands.
3. How do You Know the Difference Between a Tenosynovitis & a Pulley Injury?
There are 7 main differences between a pulley tear or rupture and a tenosynovitis.
This is what you should look and listen out for:
- An acute pulley tear or rupture can be accompanied by a “popping” sound whereas a tenosynovitis doesn’t make a sound.
- When you have finger pain an annular ligament injury is more likely to hurt in a crimping position and not while using an open grip. A tenosynovitis on the other hand is more likely to hurt in an open grip as well.
- Rock climbing tenosynovitis is usually around the A2 or A4 pulley, so if you have palmar finger pain along the A1 or A3 pulleys it’s more likely that it’s a pulley injury.

- If you extend your fingers and your forearm you stretch the forearm flexors and tendons which might hurt in the case of tenosynovitis but not with a pulley rupture.
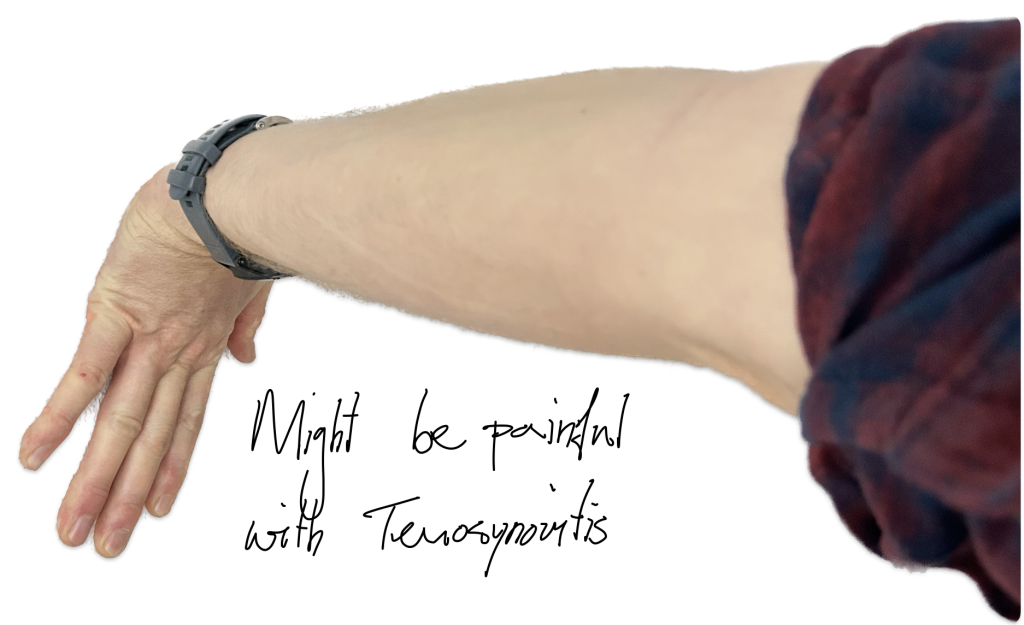
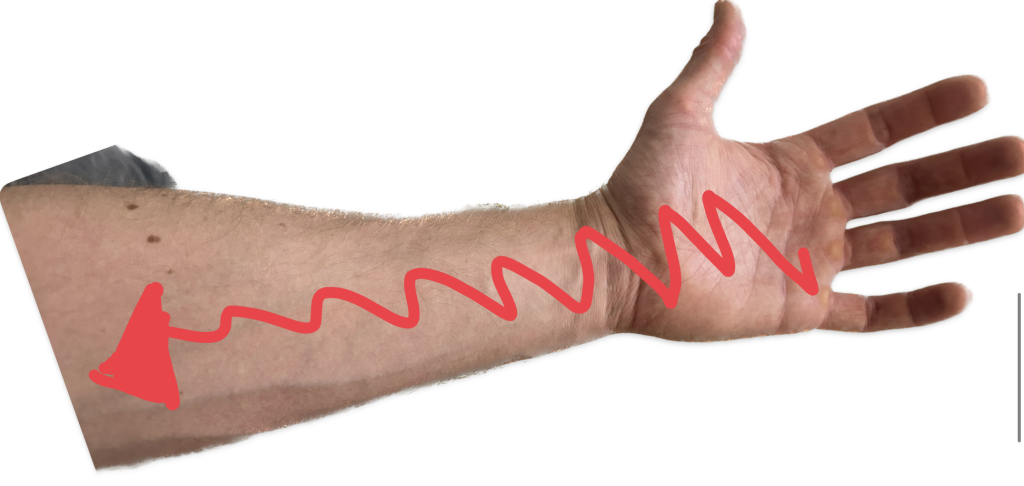
- A tenosynovitis can cause radiating pain into the forearm, but a pulley injury won’t.
- If you experience catching or blocking your fingers and/or nodes on your finger flexor tendon you might have an advanced form of tenosynovitis called a stenosing tenosynovitis or trigger finger (this injury has a slower healing time and requires more rest).
4. What Is the Fastest Way to Heal a Tenosynovitis?
The fastest way to heal a rock climber tenosynovitis is by resting shortly to decrease inflammation, then altering your climbing volume, intensity and the type of holds you use in to start with. Thereafter you need to progressively increase your climbing while doing exercises designed to speed up the recovery of the tendon sheath. If you have a tenosynovitis for a long time already and it’s also hurting in your everyday life you might need to take a longer break from climbing and wear a splint for 1-2 weeks to give the tendon sheath a complete break.
Here’s the rehab plan for your rock climber tenosynovitis in detail. The total time to heal from a tenosynovitis is likely to be around half a year but it can be shorter as well as longer.
4.1 Phase 1: Kill the Inflammation
When there’s an active inflammation, there’s pain, redness, heat, and swelling at the injury site. This inflammation is important for the healing process, and you should only consider taking anti-inflammatory drugs if the inflammation doesn’t subside with rest, splinting, and the altering of training load after 3-4 weeks.
During these initial days, it’s important to predominantly rest to give this process time to complete. There are some things you can do to support it though:
- Make a compress bandage around your finger to support circulation.
- Use a splint to immobilize your finger if it’s hurting during everyday activities
- Do pain-free passive movements of the finger and progress to a pain-free active range of motion.
- You can do ice baths with your hand and fingers to increase blood circulation
You can progress to phase 2 if you don’t experience pain in your everyday life anymore.
4.2 Phase 2: Pain-free Active Range of Motion and Submaximal Hangboarding
Now that your everyday irritation is gone you can start to increase the load on your tendon and sheath to stimulate regeneration. This is done best by demanding the function of the injured tissues that you want them to be able to handle when you’re healed.
So, you need to move, hang (because you’re a climber), and stretch the tissues, guided by your pain levels. Here’s what this phase looks like exactly:
- Do active range of movements of the fingers (make a fist and open your hand is one repetition) with pain levels up to 3/10 3x/day for 2×20 repetitions until you can move your finger freely without any pain at all. Then continue to do tendon glides 2×10 repetitions 2x/day.
- Hang off a hangboard, use a pinch block, or an edge somewhere at your place, in the open grip, half crimp, and full crimp positions. Hang 20 seconds on the minute 3x for each grip type. Keep your feet on the floor and use an intensity between 10-50% of your max depending on your pain levels. You’re allowed to feel pain up to 3/10 which should subside as soon as you’re not hanging/pulling anymore. You can do these submaximal hangs daily.
- Do finger extension stretches 30 seconds 3x/day.
- Do finger extensions in a low resistance theraband or elastic band 3×15 1x/day.
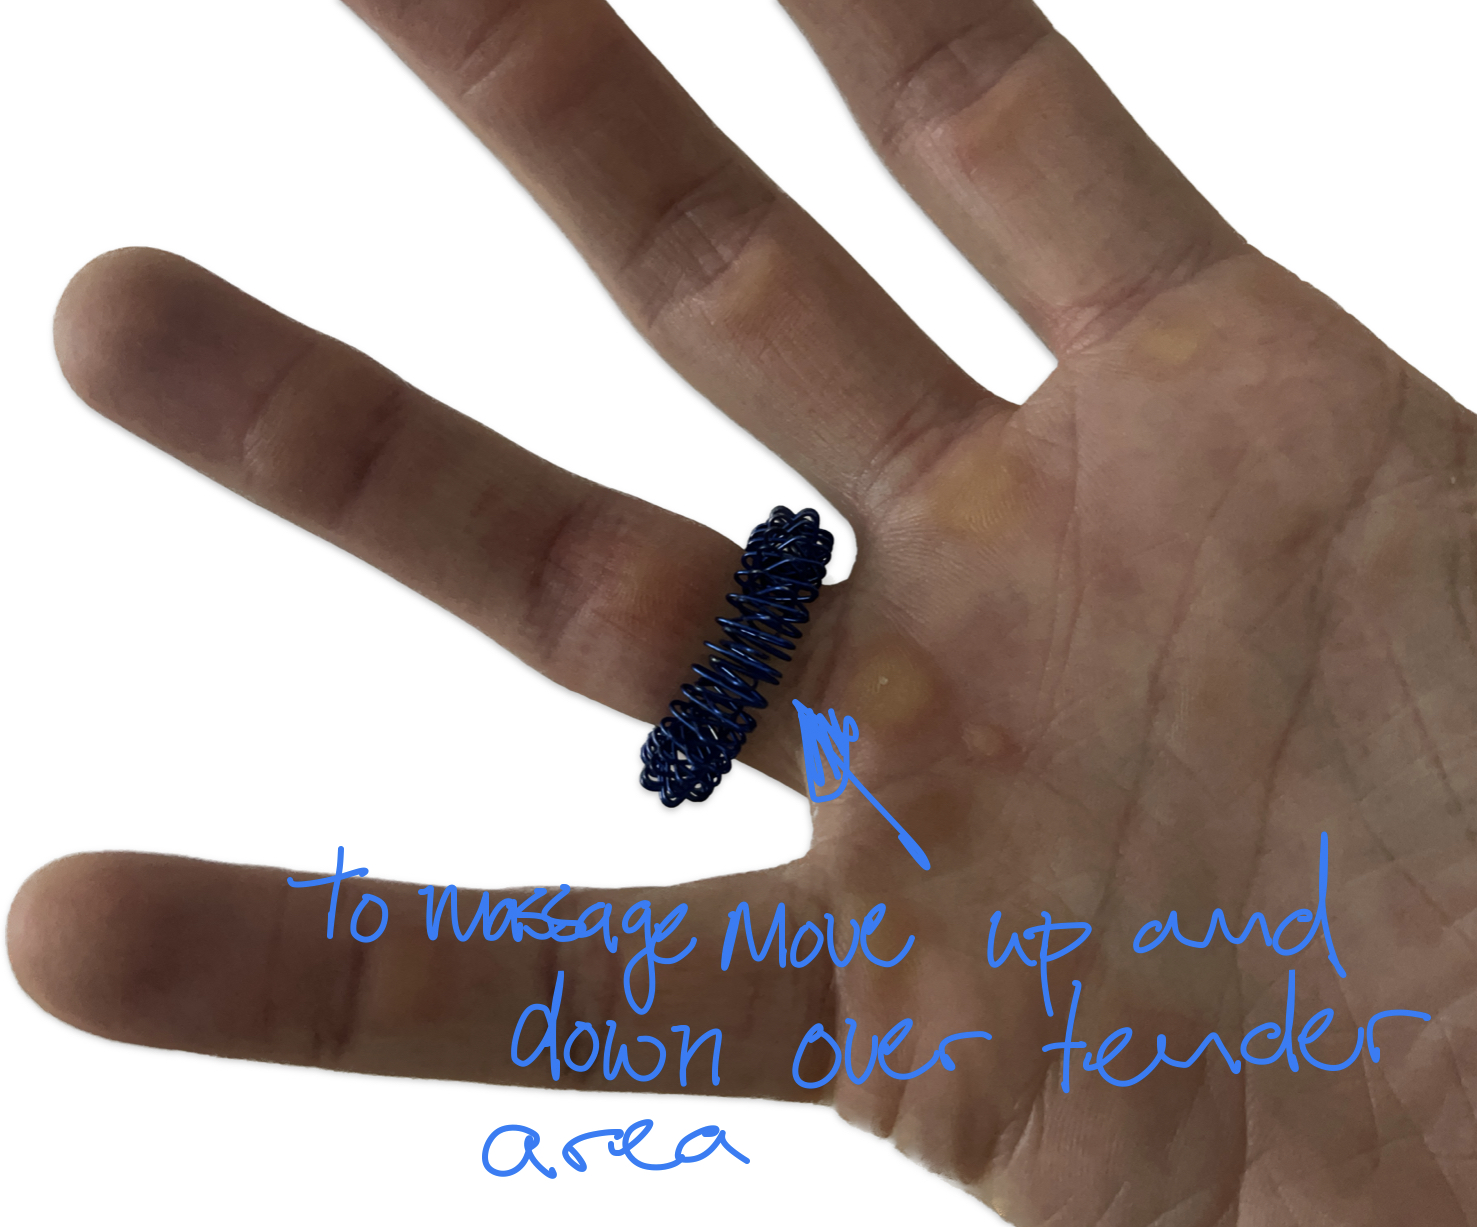
- Use a massage ring or a flat edge to massage the site of the injury 5 minutes/day to stimulate healing of the tendon sheath and prevent scar tissue formation.
- You can climb on jugs and easy hold while using an H-Tape around your finger for added protection. Avoid crimping during this phase.
Also, make sure that you continue your regular strength training for rock climbing and antagonist training that doesn’t load the finger.
Once you can hang or pull entirely pain-free with a load of up to 50% of your max intensity you can continue to the final phase.
4.3 Phase 3: Building Intensity
Now it’s time to return to regular climbing and increase the intensity of your finger training.
- Start to increase the intensity of your climbing weekly with a grade/week. Start 5 levels below your red-point level. Never allow your finger to hurt more than 3/10 while climbing. The pain should subside as soon as you stop climbing.
- Increase the intensity of your finger training by doing 6×10-second hangs. Do 2 sets on each grip type and increase hanging intensity by 10% weekly. Or guided by pain (no more than 3/10 and the pain should subside as soon as you stop loading).
- Continue massaging the injury site until you don’t feel any irritation anymore while doing so. You can compare it to the finger on the opposite side to feel how it should be.
Congratulations! If you have passed through all these phases and rehab steps, you have managed to return to your original climbing level. Well done!
Now the best thing you can do for your climbing is to not get the injury again, right?
That’s why you’ll find an overview of how to prevent a rock climber tenosynovitis in the future below.
5. How to Prevent a Tenosynovitis from Rock Climbing?
If you want to prevent rock climbing tenosynovitis you want to manage the common overload mechanisms as well as you can.
Here’s the list of the common overload mechanisms again and how to best deal with them:
- (Half) crimping holds most of the time; train your open grip. You can start on the hangboard to get comfortable with this novel hand position. If you’re like me and your pinky finger is a lot smaller than your ring finger you might feel stronger using an open grip or with 3 fingers instead of 4.
- Climbing a lot on pockets; variety is key. Climbing one style only is a recipe for disaster. And pockets because of the strain they put on individual fingers even more so. So again, don’t get caught up in a singular project. Have side projects and try to climb as varied as possible. If you want to get better at climbing on pockets though, treat it like you’re entirely new to the “sport” of pocket climbing and start way below your usual red point level to let your finger acclimatize.
- Doing a lot of dynamic moves; like climbing pockets, variety is key. Also, dynamic moves give you less time to think and correct your movement. So, before you start doing dynos often ensure that your technique is super solid.
- Campus training; only do campus training if you’ve been climbing for more than 3-4 years and climb around 7c. Before that, the risk-benefit ratio is too much on the side of the risk of injury. As campusing is a specific training tool, don’t just train to be able to jump to high and smaller rungs, but focus on perfect technique also.
- Foot slip: foot slips can happen to anyone. Nevertheless, they’re more likely when you’re tired and when climbing on bad rock quality.
- A sudden increase in training load in the previous weeks: this is probably the most important factor in any climbing-related overuse injury. The best way to prevent making unresponsible jumps in your training volume is by keeping a training log. At the bottom of this post, you can download my training dashboard which is a smart training log that helps you generate insight into your training load and helps you to prevent injuries before they stop you from climbing.